1994 2.0L "firing order"

2barry7

New member
Joined
Mar 3, 2015
Messages
9
Reaction score
0
Points
1
Hey all.
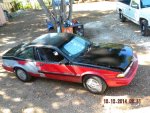
My Sunbird has been sitting for 10 years, no lie, waiting for a new cylinder head. It was in an insulated, not heated garage, and is in pretty good shape.

Rewind a bit, when I parked it I had replaced the cylinder head gasket in February and it failed again come December, water in the oil, etc. The oil was drained the head removed and it sat. Eventually I had a machinist look at it and he discovered the crack between the valves.

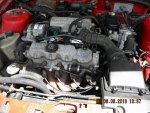
Fast forward to present. Purchased new/reconditioned head, rockers, lifters, new belts, new tensioner (old one was busted!), PCV hose assy, reassemble.

Engine is not firing properly, think my timing/ distributor is out of whack. Chiltons book is non descript on this engine. See here:
picture.php


Fig 19 is this cars coil assembly where the plug wires go.
picture.php


My first guess was match # to cylinder, no go, replaced plugs and tried wiring as per:
picture.php

Fig 26 is no better. Fig 28 makes no sense to me at all.

One other thing is funny as well. The gas gauge is on high high.
picture.php

Tried draining the tank with a siphon/pump and only got maybe 2 gallons out of it. The gas was cloudy and dark at first so figured this would fix it. Tried to refill from a 5 gallon jerry can and tank only acceptssame 2 gals of gas. Some kind of anti siphon in the line?

So probably bad gas and no idea on the plug wiring. Asking here first before I hit up the local mechanic for big help. And a big bill.
 
93 and 94 2.0L

Yes that helps. Looks like same problem. lol. Other than showing the other end with no crossing of wires I'll stick with those labelled locations and wires as; 1-1,4-4,2-2, 3-3.

Thanks.
 
One other thing is funny as well. The gas gauge is on high high.
picture.php

Tried draining the tank with a siphon/pump and only got maybe 2 gallons out of it. The gas was cloudy and dark at first so figured this would fix it. Tried to refill from a 5 gallon jerry can and tank only acceptssame 2 gals of gas. Some kind of anti siphon in the line?

So probably bad gas and no idea on the plug wiring. Asking here first before I hit up the local mechanic for big help. And a big bill.


You cant siphon fuel from the filler neck ( someone else here tried it and it has an antisiphon device installed from the factory)

The only way to drain the tank is either remove it or disconnect the fuel filter ( rear underneath by the tank) and hook up a hose to a container and turn the key on.

Sitting that long with fuel could of ruined everything from the sock to the pump to the sending unit.

Also, Check your tank ground wire/ strap to see if its corroded , that causes the past full reading if it really isint.

Doug in P.R.:cool:
______________________________
 
Sunbird running like a clock

Update here.
Fuel line at filter location is very rusty and not able to remove it without breaking something. Removed line from tank side of filter and was able to pump some gas out of the tank through a garden hose and funnel but the pump only runs for a second or two when you turn the key on (no start). So I'm done off to the mech for replacement of fuel filter and no start.

He quickly told me that the timing was off and if any damage to valves etc may have to remove head (yikes). Did I want to tow it home and try again. I said no chance of that as after 10 years I have room in my shed again and no room for the Sunbird, so take your time but hurry up.

After a couple of weeks of waiting he tells me he just about has it figured and didn't remove the head (whew). Replaced my filter which I couldn't do. Replaced a failed CPS sensor. Set the timing. Replaced my block heater as well. Put Seafoam fuel additive into my still full fuel tank. Happy motoring!

Funny thing was the tow driver had never heard of a Sunbird and neither had the younger Mechanics (lol). Wasn' t this the most popular car in America at one time? Maybe not but they are few and far between now.

After paying the bill (+$700) we had a chat about common failures on this car in particular the head gasket. His secret is "change the antifreeze" if it's in there for longer than 2 years it's gonna blow. So I'll watch for that.

Thanks for the help. Great forum.
 
For future reference, you can apply 12volts to the G terminal in the aldl plug and it will run the fuel pump. Did he put Dexcool back in it or green antifreeze?
 
Your mechanic is a little lost, the 2.0 OHC is a noninterferance motor which means: if the timing belt jumps a tooth or breaks , the valves will not hit the pistons unlike alot of the cars these days.:cool:

And he didnt set the timing, there is no way to do it ( computer adjusts the timing - no mechanical way to adjust it. only 91 and earlier cars have a distibutor )

Doug in P.R.:cool:
 
Last edited:
Clean up

Regarding the 12v to the G term in the aldl plug, that would be kind of important. lol.

The inference in "setting the timing" of course is that I had to have installed the timing belt incorrectly. After doing it once before I didn't think I'd have a problem this time.

I aligned the marks on the fly wheel and cam gear as specified in the manual but didn't pay attention to the valves as to whether I was on the compression or exhaust stroke. Put the belt on and turned the crank several times watching the marks line up on each revolution. I don't know if you can do this wrong?

So the mechanic took the timing cover came off and put it back on,
picture.php

minus the dust shield I suspect.

The finished product is in this photo. Notice the short stud is in the wrong location should be one cylinder over to the right allowing for the bracket that would hold the wires for cylinder 1 and 2. Two new plumbing pieces there cost me $70 and $40 each.
picture.php


Not perfect.

The kid is running the last of the gas out of the tank bombing around town without issue. So far so good. The gas gauge settled down after the first 50 miles or so and seems to be ok.

Checked the antifreeze this morning, it's the green stuff. The Dexcool was recommended for later model cars according to the Google search I did. What's the sense around here? What do you have to know about Dexcool?

Next project after finding the missing dust shield is replacing some dash lights. Any heads up?

Thanks.
______________________________
 
Cluster R & R is not that difficult ( some clips and some Torx or 7 mm bolts )

It comes out in one piece once all the trim plastic, wiper and headlight switches are out of the way if I remember correctly.

Timing belt does not line up exactly straight on the marks ( rear timing cover and cam) its off to the right about half a tooth.

Car looks exactly like mine under the hood ( but now on the outside the car is code 81 Bright Red / two tone black)

Doug in P.R.:cool:
 

Attachments

  • DSCN1782.JPG
    DSCN1782.JPG
    76.9 KB · Views: 133
  • DSCN1937.JPG
    DSCN1937.JPG
    75 KB · Views: 120
Last edited:
Back
Top