
Sebastian S.
New member
Hi folks!
In this thread, I want to share the steps and my thoughts while rebuilding my 1949, 12-bolt differential. Please be aware that I am NOT a professional mechanic – I just own two different service manuals and I did hours of investigational work on the internet. One can see my learning curve by reading through my steps. I am not perfect and this is just a "serious hobby" for me!
You probably have better mechanical education – and thus have a better idea or way to do things differently – or you are just interested in my work and made your own profound experiences...in both cases, please feel free to give your opinion. I am willing to learn and I am open minded.")
Why did I have to rebuild it anyway?
When I bought the car about a year ago, I only noticed little drops of oil coming out of the gearbox rear end. So I thought, that drivetrain noise during cruising was mainly because the lack of oil in the gearbox and "normal" wear of the differential. I could feel the wearing state of the differential between push and pull driving states as part of the "overall play of the drivetrain". The noise itself startet as a nasty rattling noise on higher speeds – the way it sounds when a bushing is worn out and a shaft starts to rattle in the bushing because of excessive play.
So first thing I did was to rebuild the gearbox with quality bearings (SKF) and a selfmade bushing for the outlet shaft.
Note:
I exchanged the shaft-outlet sealing ring by a standard (modern) shaft seal with dust lip, to be oil tight for the next 30 years or so. I also drained the old oil from the differential, which turned out to be 150-200 ml stinky liquid of dark honey-sirup consistency.
First test drive
My work on the gearbox reduced some of the noise. Shifting is now a little more "tight" or "direct" and the only noise coming from the gearbox is from the teeth inside. After a high-speed test drive on the motorway (75 mph for about 10 minutes) the car developed a very loud (!) nasty purring and vibrating sound. I headed back to my garage but even on lower speeds, the drivetrain was generating a resonance rattling. Really loud and scary.
Back in my garage, I drained the oil from the differential and again found only about 200 ml oil in there – so it seemed to be obvious that the new noise wasn't coming from the gearbox.
That was the initial point on which I started my investigation about how to rebuild a differential.
Spare parts:
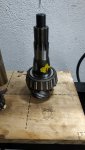
I found a NOS ring and pinion set (ratio 41:9 = 4.55) for small bucks (120 $ + 70$ shipping) and I ordered new bearings at Bearing Revolution.

Putting things together again...
My first attempt was to put everything together without the help of any special and precise tools except my 20 tons hydraulic press and some nail varnish from my wife.


Note:
I figured out that the bearings were pressed on firmly and I had to apply approx. 6 tons in order to get the old bearings cups off the housing. I used 5 tons and a bit of ceramic lube spray to press on the new bearings. Some grease would have worked as well.")


Be precise, take your time...read the service manual FIRST
In my first attempt, I reused the shim from the former ring and pinion set only to find out, that I had to disassemble everything again in order to get it right!
Note:

I will add some more information step by step. If you are missing something, just let me know. I didn't make pictures of every state though, because at that time, I wasn't thinking of a picture story. Sorry for that!
In this thread, I want to share the steps and my thoughts while rebuilding my 1949, 12-bolt differential. Please be aware that I am NOT a professional mechanic – I just own two different service manuals and I did hours of investigational work on the internet. One can see my learning curve by reading through my steps. I am not perfect and this is just a "serious hobby" for me!
You probably have better mechanical education – and thus have a better idea or way to do things differently – or you are just interested in my work and made your own profound experiences...in both cases, please feel free to give your opinion. I am willing to learn and I am open minded.
Why did I have to rebuild it anyway?
When I bought the car about a year ago, I only noticed little drops of oil coming out of the gearbox rear end. So I thought, that drivetrain noise during cruising was mainly because the lack of oil in the gearbox and "normal" wear of the differential. I could feel the wearing state of the differential between push and pull driving states as part of the "overall play of the drivetrain". The noise itself startet as a nasty rattling noise on higher speeds – the way it sounds when a bushing is worn out and a shaft starts to rattle in the bushing because of excessive play.
So first thing I did was to rebuild the gearbox with quality bearings (SKF) and a selfmade bushing for the outlet shaft.
Note:
I exchanged the shaft-outlet sealing ring by a standard (modern) shaft seal with dust lip, to be oil tight for the next 30 years or so. I also drained the old oil from the differential, which turned out to be 150-200 ml stinky liquid of dark honey-sirup consistency.
First test drive
My work on the gearbox reduced some of the noise. Shifting is now a little more "tight" or "direct" and the only noise coming from the gearbox is from the teeth inside. After a high-speed test drive on the motorway (75 mph for about 10 minutes) the car developed a very loud (!) nasty purring and vibrating sound. I headed back to my garage but even on lower speeds, the drivetrain was generating a resonance rattling. Really loud and scary.
Back in my garage, I drained the oil from the differential and again found only about 200 ml oil in there – so it seemed to be obvious that the new noise wasn't coming from the gearbox.
That was the initial point on which I started my investigation about how to rebuild a differential.
Spare parts:
I found a NOS ring and pinion set (ratio 41:9 = 4.55) for small bucks (120 $ + 70$ shipping) and I ordered new bearings at Bearing Revolution.
Putting things together again...
My first attempt was to put everything together without the help of any special and precise tools except my 20 tons hydraulic press and some nail varnish from my wife.
Note:
I figured out that the bearings were pressed on firmly and I had to apply approx. 6 tons in order to get the old bearings cups off the housing. I used 5 tons and a bit of ceramic lube spray to press on the new bearings. Some grease would have worked as well.
Be precise, take your time...read the service manual FIRST
In my first attempt, I reused the shim from the former ring and pinion set only to find out, that I had to disassemble everything again in order to get it right!
Note:
- Check the face of the pinion and the housing for the correct number of shims you have to apply. Refer to the table in the service manual!
For example: If there is no number on your pinion and no number to be found on the housing, you don't have to install any shim at all.
- Nail varnish works pretty well for marking here. Only let it dry thoroughly one coke or beer long in order not to spoil the pinion! The main advantage of nail varnish is, that you can apply a thick layer which is as thick as the play between ring an pinion. That way, I only had to turn the ring 360° once to achieve markings on both sides of the ring. For me, that worked well.
- Use medium-strong thread glue and do not overtighten the 12 bolts by using the specified torque!! You must know that any lubricant (such as oil residues, grease or thread glue) will significantly lower the friction between bolt and thread. The specified torque from the service manual only applies to dry, clean thread and bolts. I wasn't thinking about that fact when I destroyed the original bolt by using the adviced torque and thread glue. To my luck, I didn't kill the thread of the ring.
I will add some more information step by step. If you are missing something, just let me know. I didn't make pictures of every state though, because at that time, I wasn't thinking of a picture story. Sorry for that!
Attachments
Last edited:

 I own a Paulimot F207-V for almost 2 years now, but I never machined something more exciting than a lamp holder for a bicycle, drilling some holes in mild steel and a license plate holder out of aluminum. I was really scared to work on the housing. So it took me 2 hours to center it on the mill and some 2 hours more to gradually widen the seat.


 But don't be fooled - those marks are visibly only...I couldn't feel any roughness with my fingers.


 Plus there is a risk of certain loss of grease and that moisture and dust will be able to get into the bearing! Waste.


