bad rear suspension

bluedemon

New member
Joined
Jun 16, 2015
Messages
70
Reaction score
0
Points
0
Location
Hartford,Wisconsin
Well I am now working on my air suspension because the rear of the van is very low. I checked the fuse and it was good. Then I went into the back of the van and hit the"on" button to see if that panel had power and I could here it click. I jacked the back of the van up and I found my problem. The compressor is gone! The bracket that it mounts to was still there so I took that off. I see one air line that I'm assuming goes to the shocks. Now I have to find a good deal on a compressor!! Any ideas why someone would take the compressor off and not fix or replace it? I also noticed that the connector that is supposed to plug into the compressor is corroded (green). Is there a way I can clean it without having to cut the connector and splice another one into it?
 
I looked at GM parts direct and they no longer sell this compressor. Doorman sells a replacement compressor.

While looking a the GM site I noticed they have two different part numbers,one for the extended Montana on for the standard.

Make sure you purchase the correct one if you buy it online.

This could prove to be a expensive time consuming venture.

I still suspect that the springs are sagging both front and rear.

You will find in a good service manual, ride height measurement data .

My point is once you get the factory ride height corrected you may want to skip the step of spending money on a pump only to find other problems.

Before I purchased a new compressor, I would first install a schrader fill valve to fill the shocks and lines to check them for leaks.

I would also open a wiring diagram and make sure the compressor would get the signal to run.

It is possible GM engineers over complicated this by having the BCM get involved to ramp up the alternator while the compressor is operating.

I suggest caution before spending money on this until you know exactly what is needed.

The connector can be cleaned with a 50/50 white distilled vinegar solution, soak the connector in this solution.

You may have to use tooth picks or some other device to get inside the connector bore to help clean up the corrosion.

After cleaning you will want to neutralize the acid from the vinegar to do this, rinse well and soak in a baking soda solution then rinse again and dry. then spray the connector with some lubricant like WD-40.

If you have a ultrasonic jewelry cleaner add the vinegar water solution to the machine and run it until the connector is clean, then do the same steps with the baking soda water solution, and a final cycle with just water solution for rinsing.

There is no reason you couldn't just use the OEM air line permanently adapted to a schrader fill valve located somewhere easy to access to fill on occasion.
 
That is a great idea EaOutlaw about installing a line to see if the shocks even work. Can I even get a adapter that will fit in the plastic line connector that would otherwise connect to the compressor? I will worry about the bad electrical connector later than.
 
For now take a picture of the tubing that connects to the compressor. and take a picture of the tubing where it connects to the rear shocks.

You will need to post the pictures here, and post the measurement of the tubing.

To measure the tubing just find a open end wrench that fits over the tubing perfectly with no slop and without crushing the tubing to get it to slide on.

The size wrench that fits will be what size compression fitting you will need.

you could use a dial caliper to get the measurement but a wrench will work for our purposes.

FYI Napa sells a set of rear air shocks including the lines and everything you would need to bypass the entire system If you would rather not be bothered trying to resurrect the OEM level ride system.

http://www.napaonline.com/Catalog/CatalogItemDetail.aspx/Air-Shock-Kit-Rear/_/R-NS_MA826_0484365963
______________________________
 
I talked to a couple of friends at work about my situation with the air compressor and one of them just so happened to have a friend that owned a Montana like mine but the engine was no good. He said that it had air shocks in it and if I wanted the compressor all I had to do was pull it out and it was mine. I went ahead and pulled it out. It was pretty dirty but I hooked power directly to the motor and it worked great! Is there some kind of lube or anything that I should put in it if possible. What should I do about the hose that comes off the motor(I think it's the breather) because it is completely dry rotted out and the foam "breather" is missing.
 
The air line part of the system has a dryer that normally gets replaced when you open up the system.

DRYER - 2002 PONTIAC MONTANA (22153476)

I could not find a NOS part on eBay or GM parts direct.

You should find a replacement for the dryer, it will wick moisture right from the air and it should have been replaced on a regular service interval even if the old compressor was still working who knows how long it has been disconnected left open to the outside air and moisture.

Ford Mercury Lincoln all sell various dryers for their level ride system. you may be able to retrofit the Ford part to your Montana.

The same goes for the inlet tubing and foam filter for the compressor. You will have to get creative.

I am not sure if this dryer can be adapted to work with your system or not, this dryer is for a complete level ride system, Mercury has a rear level ride system that only has two fittings on the top of the canister. both have a fitting that screws or mounts to the compressor assembly I forget how they are attached.

http://www.ebay.com/itm/1984-1992-L...ash=item4d36e03cfd:g:ZTMAAOSw9N1V1U0v&vxp=mtr

Now that I am thinking about it you may be able to adapt a dryer for a shop compressor

http://www.harborfreight.com/Inline-Desiccant-DryerFilter-68215.html

Again you will have to get creative to save this OEM system or spend many hours searching the internet for OEM NOS parts.

To my knowledge these compressor do not get oil added to them, yet I do not know for sure. You will have to read about it in the owners manual or factory service manual.
 
I just found a dryer that may be available from GM for the 2002 Chevy Venture

Chevrolet Genuine Factory Part

Fits 2002 Chevrolet Venture LT

Part Number: 22153476 this is the same part number that shows not available for the Pontiac it may not be available on this site but the do not indicate either way.

I checked the GM parts direct site it shows unavailable. It is worth calling your local GM dealer and ask if they know of anyone selling NOS parts for the Montana or Venture


DRYER All Models 2WD
Item # on image
MSRP
$140.09 Online Price
$89.43
http://www.gmpartsonline.net/2002-chevrolet-venture.html
 
Hello Bluedemon!
If you have not broken flask dryer, then you can buy a kit for recovery. It is not expensive .
see the website ....http://stores.ebay.com/Suncore-Industries/Compressor-Dryers-/_i.html?_fsub=1778578010

11457145.jpg
______________________________
 
Thanks for the reply's but I may not of explained correctly what I was talking about. I am just talking about the rubber hose that comes off the motor and goes to a "t". One part of the hose goes to the head? and one goes to the filter?
Can i just use a rubber hose or does it have to be a special kind. If you look at the picture I am talking about the hose that connects to #6 the filter(I think), #18, and # 20. I hope this helps and that I'm explaining this accurately. This is the hose that I mentioned was dry rotted.
th.jpg
 
take a actual picture of what your working on the diagram you sent is too small, I think you saved the thumbnail and not the picture.

We have been mentioning the dryer because you have to replace it or rebuild it.

The hose your taking about may be a suction hose or discharge. this matters as to the type of hose you want to use.

When I get time I will look at the GM part diagram and try to find the figure numbers your talking about
______________________________
 
Sorry about that! Here is what I am talking about in the first picture. The hose in the first picture is supposed to go to the second picture. and then it goes to a breather or filter. Are you talking about that black "cylinder" that the air line is connected to in my third picture? I would rather rebuild it if possible.
 

Attachments

  • 20160213_165929.jpg
    20160213_165929.jpg
    53.4 KB · Views: 58
  • 20160213_165855.jpg
    20160213_165855.jpg
    74 KB · Views: 55
  • 20160213_171619.jpg
    20160213_171619.jpg
    48.3 KB · Views: 56
I tried to find the diagram you are working from with no luck, You will have to post a better diagram from a manual so i can tell which lines your working on.

Or just take pictures
 
Here is a good picture of what your rubber vacuum lines should look like.

You will want vacuum lines nothing special.

Hopefully you still have the bulkhead fitting where the foam filter attaches, I am guessing this is routed in the back of the van somewhere close to the compressor.

If you do not have the bulkhead fitting from either vans this could be made up pretty easily

http://www.ebay.com/itm/BLACK-MINI-...ash=item5425ac7efb:g:g5UAAOSw~bFWH~Uq&vxp=mtr


you could use something like this to make the connection you may need washers to fit the existing hole in the floor pan. connect plastic tubing to this part then the vacuum lines to the tubing and the filter to the tubing inside the van. just find one that is the right size for your needs.
______________________________
 

Attachments

  • s-l1600 (1).jpg
    s-l1600 (1).jpg
    62.4 KB · Views: 52
Sorry about that! Here is what I am talking about in the first picture. The hose in the first picture is supposed to go to the second picture. and then it goes to a breather or filter. Are you talking about that black "cylinder" that the air line is connected to in my third picture? I would rather rebuild it if possible.
Hi !
You can find that tubing at a hydraulic hose shop and buy it by the foot they will also have all the push to connect fittings you will need as well for a LOT less than buying a factory assembly. You buy a hose and fittings shop for 10$-20$

11464429.jpg
 
Last edited:
So this is what I did as of now. I cut the old plug off and crimped a new one into it. After that I plugged it in electrical wise and I turned the key on the Montana and after about a minute the compressor came on for about 5 seconds and shut off. I do have the van up on jacks to where the back is level. I don't have the air line hooked up because I haven't changed the dryer or the filter. Is that what it is supposed to do normally? Thank you for the help and the awesome photos EaOutlaw and Sergeimoskva! I really appreciate it!!
 
From what I remember with the van running the compressor should run until the van is level based on the rear level sensor.

Once the van is level by the rear shocks adjusting the ride height or by you jacking up the rear of the van until its level the compressor should shut off.

This being said how are you jacking up the rear of the van? are you jacking up the body or the entire vehicle rear suspension and all?

If you jacked up the van by the suspension and tried the compressor by running the van the compressor should have started running and stayed running. because the sensor would show the van is not level.

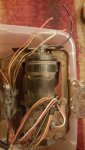
here is a link to the sensor that controls the ride height

http://www.ebay.com/itm/Level-Contr...ash=item418be663e0:g:mQkAAOSwgQ9V59Sl&vxp=mtr

To test the system you would need to start the van with the van on the ground, and the compressor should start running, then jack up the rear of the vehicle by the trailer hitch if you have one until the van is level or the compressor shuts off.

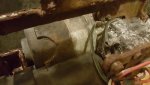
For now keep it simple attach the line with the old dryer and test the shocks,lines,compressor and dryer for leaks.

Use a spray bottle with water and dish soap. look for bubbles.

Running the system for testing purposes with the old dryer will not hurt it anymore than it has been with the system open to the elements.

You need to find out first if the system works as it is designed, you need to find out if you have any leaks. and you also need to find out if the rear springs are sagging like I suspect.

Remember I believe the rear springs control the unloaded ride height, the compressor normally wouldn't need to run unless you have cargo in the back or if your towing something.

I cannot tell you about the 5 second run time your getting, it may sense no load on the compressor and shut it off automatically.
 
I have the van jacked up by the frame and not the suspension. I will try that test you mentioned tonight. I have no hitch so I will put a jack under back of the van like I did to get it on jack stands.
 
Back
Top