Broomba 70 Lemans Resto-Mod

Joined
Oct 17, 2013
Messages
47
Reaction score
0
Points
6
The other thread was getting full and the title didn't describe the thread so I started this one. First, Broomba, because that's what my grandson calls the car.

Anyway, my last post mentioned my key tumbler broke loose. The update to my blog shows what I did. The problem was the sector gear. The blog also shows the difference in location of the slot to remove the key tumbler. It seems my car is a little different than whatever I find online.

http://70lemans.blogspot.com
 
thanks for the update
 
Finally got a little more work done. I had a crushed clearance light connection. I couldn't find new so I repaired it. I also, mocked up the front end. If you've followed previous posts or the blog you will know that I wanted to keep this a 70 Lemans and not a GTO clone. I could only do that if I could successfully repair the upper grill. This is the only year that has the chrome bumper that goes all the way to the top. If I couldn't repair the composite I would have to clone her because I can't find the upper grill piece anywhere. That said, I fixed it all painted it with a rattle can just to protect it until I paint the car. You can see it all on my blog.

Next, I'm pulling the engine to see if it needs a rebuild or if I can get away with replacing all the seals and gaskets to stop the leaks. It runs good, but leaks like crazy after sitting for 10 or 12 years.

Mark
http://70lemans.blogspot.com/
 
Ok. Out comes the engine. I took lots of photos at every step, bagged and cataloged everything. My son was giving me a little grief asking if I had even labeled which bolt came out of which hole. I held up a bag with duct tape on a couple of bolts of different lengths and said "Yup".

Anyway, look it over. Any recommendations, hints or tips are gladly welcome.

http://70lemans.blogspot.com/

Mark
______________________________
 
Have you invested in the 1970 Pontiac Service Manual and the 1970 Fisher Body Manual, they both are worthwhile for your project.
 
Its great that you are bagging and labeling everything. Also, don't throw anything away yet, even if its broken or badly rusted. Make sure it can be replaced first. And there are people out there who may wanted some of your original parts no matter what condition they are in.
 
Thanks guys. Ya I got the manuals and have had to look some things up. As far as keeping things, I've got it all, even some worn through rusted washers just so I'll know what size to replace them with.

Thanks!
 
I'm scheduled with a machinist in a couple of weeks, so I have a decision to make. Rebuild what I have or have it machined the extra .005 for a stroker kit. I'm ok with taking things apart and putting them back together following instructions for torque etc. I'm not comfortable when I read things like the "Tips" page on Butler Performance where it says stuff like "the bearings and connecting rods may require chamfering" or "The engine bearing oil clearance must be checked...use of special bearings designed for this purpose.

Am I getting in over my head with a stroker or is this something that the average Joe can figure out?
______________________________
 
having a different stroke will not effect basic engine assembly procedures, either way you have to be able to tell clearnances when assemblying the engine, or have the machinest do it.
 
Ok, just got a call from the machine shop. The block work is done. They bored & honed the cylinders to fit the Butler Stroker kit that will take the 400 up to a 466, valve job, put the hardened seats in the exhaust valve seat, new valve seals and flat decked the heads. Total cost $915. I'm pretty confident in the machinist. He's been doing this stuff for 40 years or so. I had to get a referral for him to take the job and he's cash only/retired.

Anyway, as I plan the assembly and time frame, I've got a question. I've been told that after breaking in the cam, some people say the moly coated rings are seated. Others say that all rings need about 500 miles to seat. What's the rule? I'm wondering because, I don't plan to license/insure this thing until I'm done which means, it will be quite a while before I can put 500 miles on her. If the rings aren't seated is there a problem with just pulling her in and out of the garage? I've heard both thoughts on that as well.

thanks.
______________________________
 
How much in and out of the garage are you going to be doing that it would become a factor? Typically it's not good for any engine to start it, not let it warm up, and then turn it off. Youre builder used the correct hone technique for moly? I cannt see rings being seated by just breaking in the cam.
 
Before I pulled the engine, I would start it up on Saturday morning, let it run for a while to keep the battery charged, pull it in the garage, work on it for a couple of days and put it back until the next week-end. I've heard people say doing that is a bad thing if the rings aren't seated. I guess the question is... is there a problem with running the car as just described without having 500+ miles of road under her? Would it make a difference to run the engine under varying rpm's to warm it up for a while before going into the garage even though there wouldn't be a load on the drive line?
 
So if I understand correctly, the car is normally stored outside? I guess it depends on how often you do this process, sounds like it takes a matter of seconds to move the car. I would not do this too often on an engine where the rings havent seated. As far as battery charging, use a trickle charger while it is inside, unless you can also do that while outside.
 
Sorry it took so long to respond. I had some family issues arise. So, yes, right now, the car is stored outside. I'm doing the mechanical first. If that can't be accomplished there's no sense in a pretty paint job. Once I start doing body work and interior, I'll sacrifice garage space.

The block is at the machine shop. I should have the stroker kit in a couple of weeks. So, right now I'm prepping engine parts for paint.

thanks for the tips,
Mark

http://70lemans.blogspot.com/
______________________________
 
Update: Front end tear down

It's been a while. I've updated my blog with photos. Here's the nutshell version. My machinist told me I had finally risen to the top of the list. It's been months. Earlier (July) I had posted that the machine work was done. Uh no. That was just the cost estimate. However, it was worth the wait. This guy is really good. He's been in the business for 40 years or so and you have to have a referral by one of his friends or he won't even talk to you. (Semi-retired, only working when you want, and only accepting cash must be a sweet deal.)

Anyway, I decided I had better get back to work, tear down the front end, clean, sand, paint and replace the steering, brake and suspension parts that are easier to get to with the engine out since I'll be able to drop it in, in the near future.

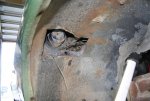
Attached is the one surprise I found when taking out the passenger side wheel well. I hadn't expected or noticed this before now. Why take all the time to remove the wheel well to get access to the blower motor when you can just cut a hole to get it out. Of course, driving in the rain and snow will rust the new one solid, but hey, you've got an access hole when you need to replace it the next time.

Mark
http://70lemans.blogspot.com/
 

Attachments

  • IMG_1917.jpg
    IMG_1917.jpg
    101.2 KB · Views: 127
Yeah that was a pretty common thing to do on a GM A-body in the day. Done mostly by mechanics when they got paid by the Job, not the hour. But that one is one of the uglier holes I have seen cut. I used to just drill a couple of access holes to get at the bolts with a long extension. Then Plug them with plastic plugs.
But I have seen quite a few with holes.
 
so we are looking at a spring time roll out?
 
Back
Top