Our 1st "Blu" LeMans Build

Thanks Sal!
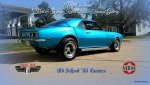
This should be as interesting as my Camaro build on the "other" forum...:cool:
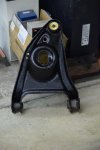
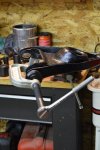
Now waiting for more parts and a few new tools to help with the build...:D
Will post when they arrive...


Kurt L71S
 
I had a visit from Clark Gick of Basic Body & Paint, Inc. in Chalmers. He looked "Blu" over and gave her the thumbs up for some new paint!....;)
I am beyond stoked! He told me that this car is so nice for being an Indiana car and also being a 1971! That's all I needed to hear. Today I started ripping the undercarriage apart! Getting ready for another 4 wheel disc brake conversion!
Even though Pontiac was part of GM, things are so different from Chevrolet! Seems like everything is on the "other" side from what the Camaro is...Oh well....One never wants to quit learning!...:D:eek:;)

Kurt L71S
 

Attachments

  • 71 LeMans-Chassis cleaning 004.jpg
    71 LeMans-Chassis cleaning 004.jpg
    58.2 KB · Views: 92
  • 71 LeMans-Chassis cleaning 007.jpg
    71 LeMans-Chassis cleaning 007.jpg
    52.2 KB · Views: 85
  • 71 LeMans-Chassis cleaning 012.jpg
    71 LeMans-Chassis cleaning 012.jpg
    44.5 KB · Views: 94
  • 71 LeMans-Chassis cleaning 015.jpg
    71 LeMans-Chassis cleaning 015.jpg
    52 KB · Views: 86
  • 71 LeMans-Chassis cleaning 017.jpg
    71 LeMans-Chassis cleaning 017.jpg
    57.9 KB · Views: 89
Some more action from today's work!...:cool:

Kurt L71S
 

Attachments

  • 71 LeMans-Chassis cleaning 026.jpg
    71 LeMans-Chassis cleaning 026.jpg
    28.6 KB · Views: 82
  • 71 LeMans-Chassis cleaning 021.jpg
    71 LeMans-Chassis cleaning 021.jpg
    43.2 KB · Views: 78
  • 71 LeMans-Chassis cleaning 007.jpg
    71 LeMans-Chassis cleaning 007.jpg
    52.2 KB · Views: 83
  • 71 LeMans-Chassis cleaning 018.jpg
    71 LeMans-Chassis cleaning 018.jpg
    26.5 KB · Views: 91
  • 71 LeMans-Chassis cleaning 008.jpg
    71 LeMans-Chassis cleaning 008.jpg
    37.2 KB · Views: 83
You have a heated garage to work in?
______________________________
 
Had a great day in the garage with "Blu"...;)

Took the whole day cleaning the frame of her with nothing other than a putty knife, gasket scraper, hand grinder with steel brush the the air compressor...:rolleyes:

I noted on the photos posted the arrows...back in the day when guys actually hand welded the frames together...all the slag and parts of the "wire weld" still left to this day...:)
I would say that this frame got welded mid week...How you might ask?....Very nicely done...could NOT have been close to "Beer 30" on a Friday!!...:D:D

Kurt L71S
 

Attachments

  • 71 LeMans Clean Frame 009.jpg
    71 LeMans Clean Frame 009.jpg
    60 KB · Views: 90
  • 71 LeMans Clean Frame 006.jpg
    71 LeMans Clean Frame 006.jpg
    48.6 KB · Views: 102
  • 71 LeMans Clean Frame 011 weld.jpg
    71 LeMans Clean Frame 011 weld.jpg
    44.5 KB · Views: 81
  • 71 LeMans Clean Frame 012 weld.jpg
    71 LeMans Clean Frame 012 weld.jpg
    34.9 KB · Views: 91
  • 71 LeMans Clean Frame 013 weld.jpg
    71 LeMans Clean Frame 013 weld.jpg
    25.3 KB · Views: 89
will you be separating the body from the frame?
 
Mel, Only to install new bushings for the body...:cool:
Unfortunately, I don't have the tools to completely remove them..

Kurt L71S
______________________________
 
Looking for a link! Wanting to know the different color of paint used in the engine bay along with the frame and underside of the 1971 LeMans Sport. Not sure it would be semi gloss, flat, gloss.....
Any help would be appreciated.

Kurt L71S
 
look at the paints in the GTO catalog from www.amesperf.com. They indicate where the different types are used.
 
Went back and forth on the color of the calipers....red-black-red-black!!...:cool:
I now have her stopping power ordered! Went with Pirate Jack Hot Rod along with the Right Stuff brake line kit!...;)
I can only imagine what "Blu" will look like when she all comes together!....:D

Kurt L71S
______________________________
 

Attachments

  • rightstufflogo-2.jpg
    rightstufflogo-2.jpg
    30.1 KB · Views: 37
  • s-l500 (1).jpg
    s-l500 (1).jpg
    32.3 KB · Views: 37
  • logo_1443622907__75727.png
    logo_1443622907__75727.png
    25.9 KB · Views: 44
  • red.jpg
    red.jpg
    21.2 KB · Views: 32
  • s-l500.jpg
    s-l500.jpg
    61.3 KB · Views: 36
so that's going to be 4 wheel disc, very nice
 
This is pretty much the look I'm going after. Bear in mind that the car will still be blue with parchment interior!...:cool:
Gotta love the AR Torque Thrust D....;)

Kurt L71S
 

Attachments

  • 961eb337be8cd1b5ce268c85dd644e19.jpg
    961eb337be8cd1b5ce268c85dd644e19.jpg
    22.3 KB · Views: 33
  • ar-vn309-torq-thrust-painted-gray-with-machined-lip.jpg
    ar-vn309-torq-thrust-painted-gray-with-machined-lip.jpg
    103.1 KB · Views: 38
No Judge side stripes planned?
 
Nope! All "Blu"...
I did receive today everything needed to finish the chassis on the LeMans!
______________________________
 
Last edited:
Merry Christmas to everyone on Pontiacforum.com....;)

Kurt and Kathy Keller L71S
 

Attachments

  • Old School 68 Camaro MBM Christmas Card.jpg
    Old School 68 Camaro MBM Christmas Card.jpg
    186.5 KB · Views: 40
thanks, same wishes for you and your family
 
This next part is not the glamorous part, but one needs to complete this part to get there. I had some time today to remove and re install new bushings in the A arms and the rear control arms...I am going to have to remove the rear end from the car as it has two upper control arms that need replaced...it'll be easier to not only replace them, but to clean and paint and also replace the fuel lines and brake lines...
Then on to making everything pretty...:D

Kurt L71S
 

Attachments

  • 71 LeMans bushing installs 010.jpg
    71 LeMans bushing installs 010.jpg
    35.4 KB · Views: 37
  • 71 LeMans bushing installs 009.jpg
    71 LeMans bushing installs 009.jpg
    37.7 KB · Views: 34
  • 71 LeMans bushing installs 006.jpg
    71 LeMans bushing installs 006.jpg
    55.5 KB · Views: 35
  • 71 LeMans bushing installs 004.jpg
    71 LeMans bushing installs 004.jpg
    64.8 KB · Views: 49
  • 71 LeMans bushing installs 003.jpg
    71 LeMans bushing installs 003.jpg
    61.6 KB · Views: 49
We removed the Rear End yesterday with some of the best help in the world! It is now on the floor of the garage and I can get to cleaning and paint. I will install the new Yoke Seal, and I might even install the new disc brakes, lines, tabs before re installing....:D
Thanks Jackson and Clint Minglin for being with me yesterday!!..:cool:;)

Kurt L71S
 

Attachments

  • 71 LeMans Rear End Removal 001.jpg
    71 LeMans Rear End Removal 001.jpg
    33.9 KB · Views: 44
  • 71 LeMans Rear End Removal 004.jpg
    71 LeMans Rear End Removal 004.jpg
    47.4 KB · Views: 33
  • 71 LeMans Rear End Removal 005.jpg
    71 LeMans Rear End Removal 005.jpg
    44.2 KB · Views: 34
  • 71 LeMans Rear End Removal 008.jpg
    71 LeMans Rear End Removal 008.jpg
    29.1 KB · Views: 34
  • 71 LeMans Rear End Removal 009.jpg
    71 LeMans Rear End Removal 009.jpg
    33.3 KB · Views: 37
Back
Top